Installation
System Requirements
| Resource | Minimum | Notes |
|---|---|---|
| RAM | 2 GB | Actual usage depends on the number of connectors and data volume. |
| Disk space | 200 MB | Several additional GB recommended for data buffering and cache. See Data Rate and Cache Sizing to estimate requirements for your setup. |
| Administrative rights | Required | Needed to install OIBus and register it as a system service. |
| Web browser | Chrome, Firefox, or Edge | Internet Explorer is not supported. |
The browser can be on the same machine or on a remote workstation. For remote access, configure an IP filter to allow the client address.
Supported Platforms
| Platform | Versions | Architectures |
|---|---|---|
| Windows | 10, 11, Server 2016 / 2019 / 2022 / 2025 | x64 |
| Linux | Ubuntu 20.04+, Debian 10/11, RHEL 8/9 | x64, ARM64 |
| macOS | 11 (Big Sur) and later | Intel (x64), Apple Silicon (ARM64) |
| Docker | Any host running Docker Engine 20.10+ | x64, ARM64 |
Installation
If you need to provision OIBus on many machines from a disk image — with installation and initial configuration applied automatically on first startup — see the Automated Installation guide.
Select your platform:
- Windows
- Linux
- macOS
- Docker
Choose the installation method that best fits your needs:
- Use the Installer for a guided, user-friendly setup.
- Use the Scripts method for advanced users or to install multiple OIBus services.
- Installer
- Scripts
Download
Installation Steps
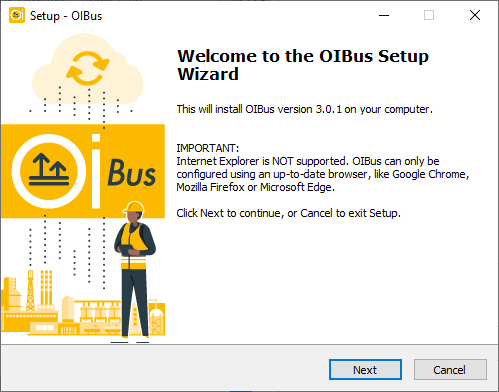
- Run the Installer Launch the downloaded installer. You will see the welcome screen:
-
Accept the License Read and accept the EU-PL license to proceed.
-
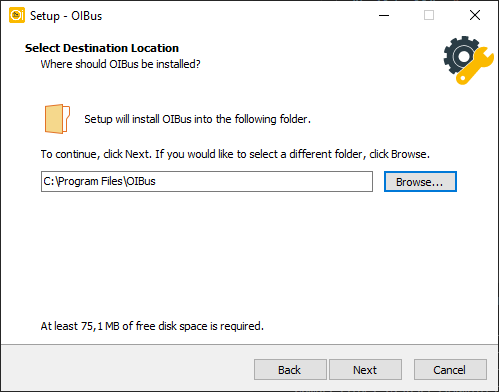
Choose Installation Path Select the directory where OIBus binaries will be installed:
- Set Data Directory Choose where to store cache, logs, and configuration files:
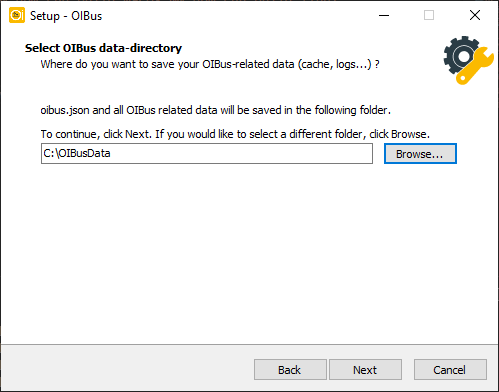
For data safety, consider placing the data folder on a separate disk (e.g., D:\OIBusData). This helps prevent
disk space issues on the system drive and improves reliability.
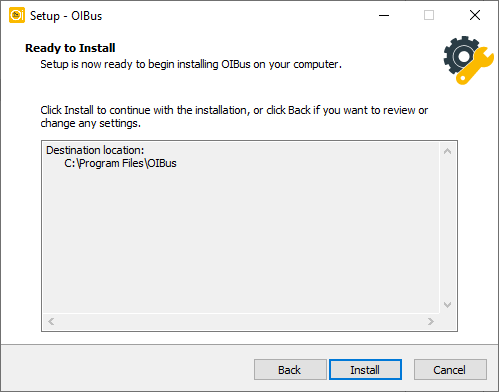
- Confirm and Install Review your settings and confirm to begin the installation:
- Complete Installation Once the installation is complete, you'll see a confirmation screen. Proceed to the first access guide to configure OIBus.
Update OIBus
- Use the OIBus Windows Installer to update.
- Specify the current executable and configuration paths.
- Choose to keep or replace your existing configuration.
- The OIBus service will briefly stop during the update.
- On first startup after the update, the
oibus.dbconfiguration database will be automatically upgraded.
Uninstall OIBus
- Navigate to the OIBus binary folder.
- Run
unin000.exeas an administrator:

- Follow the prompts to remove OIBus:

Download
Installation Steps
- Extract the Zip Archive
Unzip the downloaded file into the directory where you want to install OIBus (e.g., C:\Program Files\OIBus).
- Run the Installation Script Open an administrator terminal in the extracted folder and run:
install.bat -c "[your-data-folder-path]"
Replace [your-data-folder-path] with the actual path where you want to store OIBus data (e.g., C:\OIBusData or
D:\OIBusData).
- If you omit the
-cargument, the script will prompt you for the data path. - For data safety, consider placing the data folder on a separate disk (e.g.,
D:\OIBusData). This helps prevent disk space issues on the system drive and improves reliability.
Example:
install.bat -c "D:\OIBusData"
> Administrator permissions required. Detecting permission...
> Stopping OIBus service...
> Installing OIBus as Windows service...
> The "OIBus" service has been successfully installed!
> Configuration of the "AppDirectory" parameter value for the "OIBus" service.
> nssm set OIBus AppNoConsole 1
> Starting OIBus service...
> OIBus: START: Operation successful.
> Creating go.bat
> echo Stopping OIBus service... You can restart it from the Windows Service Manager
> nssm.exe stop OIBus
> "C:\Users\Administrator\Downloads\oibus-win_x64\oibus.exe" --config "D:\OIBusData"
Use -n "Service Name" to customize the OIBus service name. This method is useful if you need to run multiple
OIBus services on the same machine.
By default, the service name is OIBus.
Proceed to the first access guide to configure OIBus.
Update OIBus
- Extract the new files from the zip archive.
- Open the Windows Service Manager and stop the OIBus service.
- Replace the old files in the OIBus executable directory with the new ones.
- Restart the OIBus service.
- On first startup, the
oibus.dbconfiguration database will be automatically upgraded.
Uninstall OIBus
Run the following command in an administrator terminal:
uninstall.bat -n "OIBus"
> Administrator permissions required. Detecting permission...
> Stopping OIBus service...
> Removing OIBus service...
The data folder is not automatically removed. Delete it manually if needed.
Download
Or download and extract directly from the terminal — pick the archive for your architecture:
# x64
curl -LO https://github.com/OptimistikSAS/OIBus/releases/download/v3.8.7/oibus-linux_x64-v3.8.7.zip
unzip oibus-linux_x64-v3.8.7.zip -d OIBus/

# ARM64

curl -LO https://github.com/OptimistikSAS/OIBus/releases/download/v3.8.7/oibus-linux_arm64-v3.8.7.zip
unzip oibus-linux_arm64-v3.8.7.zip -d OIBus/
oibus-launcher— launcher that manages the OIBus process and handles upgradesbinaries/oibus— main OIBus executableoibus-setup.sh— interactive installation scriptoibus-uninstall.sh— uninstallation script (updated during installation)
The setup script has been tested on Ubuntu and Debian. For other distributions you may need to adapt the systemd service configuration.
Install as a System Service
-
Extract the downloaded archive and enter the directory.
-
Run the setup script as root:
sudo ./oibus-setup.sh
- Follow the interactive prompts (default values shown in parentheses):
Administrative permissions are required to proceed. Do you wish to continue? (Y/n)
Enter the directory for OIBus binaries (default: ./OIBus/):
Enter the directory for OIBus data, caches, and logs (default: ./OIBusData/):
Enter a username for your OIBus session (default: admin):
Enter a name for your OIBus instance (default: OIBus):
Enter the port for OIBus (default: 2223):
- On success you will see:
Service file successfully created. Enabling oibus service startup on system boot...
Created symlink /etc/systemd/system/default.target.wants/oibus.service → /etc/systemd/system/oibus.service.
Starting OIBus service...
Installation procedure completed!
- Open
http://localhost:2223in a browser and follow the first access guide.
Service Management
sudo systemctl status oibus    # check service status
sudo systemctl start oibus     # start the service
sudo systemctl stop oibus      # stop the service
sudo systemctl restart oibus   # restart the service
sudo journalctl -u oibus -f    # stream live logs
Update OIBus
- Download the latest version and extract it.
- Stop the service:
sudo systemctl stop oibus - Replace the binary files in the installation directory with the new ones.
- Start the service:
sudo systemctl start oibus
The oibus.db configuration database is upgraded automatically on first startup after an update.
Uninstall OIBus
Navigate to the OIBus binary directory and run:
sudo ./oibus-uninstall.sh
You will be asked whether to remove all data:
Administrative permissions are required to proceed with uninstall. Do you wish to continue? (Y/n)
Do you wish to remove all OIBus data (cache, logs...)? All data, credentials and logs about your
current OIBus will be permanently erased. (y/N)
Choosing to remove all data permanently deletes your configuration, credentials, and logs. The data folder is not removed automatically if you answer N.
Run in Standalone Mode
To run OIBus without installing it as a service (useful for testing):
./oibus-launcher --config ./OIBusData
Make sure the OIBusData directory exists before running this command. OIBus will not be started
automatically on system boot in this mode.
Download
macOS support is intended for development and testing. For production deployments, use Linux or Windows where OIBus can be installed as a system service.
Run OIBus
-
Extract the downloaded archive to a location of your choice.
-
Open Terminal and navigate to the extracted folder.
-
Launch OIBus:
./oibus-launcher --config ~/oibus-data
Replace ~/oibus-data with the path where you want to store OIBus configuration and cache files.
- Administrator permissions are required to run the binary.
- The binary must be executed from its own folder.
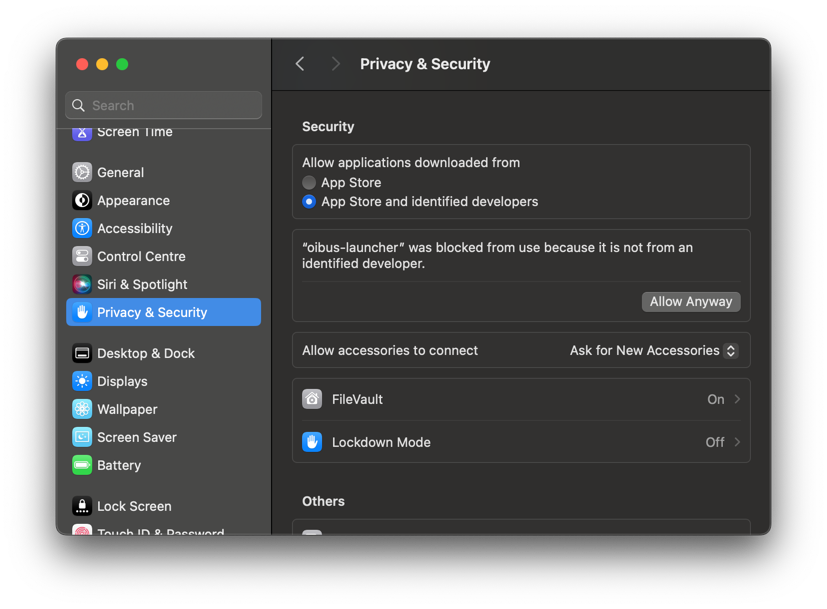
Allow App Execution
macOS Gatekeeper will block unsigned binaries on first launch. You need to allow both oibus-launcher
and oibus (which the launcher starts as a child process):
- Run
./oibus-launcher— macOS will display a security warning and block execution. - Go to System Settings → Privacy & Security.
- In the Security section, click Allow Anyway next to the blocked binary.
- Repeat for the second binary when it is blocked.
Access OIBus
Once OIBus is running, open http://localhost:2223 in a browser and follow the
first access guide.
Pull the Image
docker pull ghcr.io/optimistiksas/oibus:v3.8.7
Run the Container
docker run -d \
--name oibus-container \
-p 2223:2223 \
-v ./OIBusData:/app/OIBus/OIBusData \
--restart unless-stopped \
ghcr.io/optimistiksas/oibus:v3.8.7
The -v mount is required for production use. Without it, all configuration, cache, and logs are lost
when the container stops or is replaced.
When running in Docker, do not change the OIBus HTTP port (2223) from the web interface. The container only exposes port 2223 — changing it internally will make the interface unreachable.
Open http://localhost:2223 in a browser and follow the first access guide.
Docker Compose
services:
oibus:
  image: ghcr.io/optimistiksas/oibus:v3.8.7
  container_name: oibus-container
  ports:
    - '2223:2223'
  volumes:
    - ./OIBusData:/app/OIBus/OIBusData
  restart: unless-stopped
  environment:
    - TZ=UTC
  # Uncomment to apply resource limits:
  # deploy:
  #   resources:
  #     limits:
  #       cpus: '2'
  #       memory: 2G
Port Configuration
| Port | Purpose | How to expose |
|---|---|---|
2223 | OIBus web interface | -p 2223:2223 (included by default above) |
| (custom) | OIBus proxy server | Add -p <HOST_PORT>:<CONTAINER_PORT> as needed |
To expose the proxy server port (e.g. 9000) alongside the web interface:
docker run -d \
--name oibus-container \
-p 2223:2223 \
-p 9000:9000 \
-v ./OIBusData:/app/OIBus/OIBusData \
--restart unless-stopped \
ghcr.io/optimistiksas/oibus:v3.8.7
Update OIBus
Pull the new image, then recreate the container. The data volume is preserved:
docker pull ghcr.io/optimistiksas/oibus:v3.8.7
docker stop oibus-container
docker rm oibus-container
docker run -d \
--name oibus-container \
-p 2223:2223 \
-v ./OIBusData:/app/OIBus/OIBusData \
--restart unless-stopped \
ghcr.io/optimistiksas/oibus:v3.8.7
With Docker Compose:
docker compose pull
docker compose up -d
The oibus.db configuration database is upgraded automatically on first startup after an update.