OPC UA™
OPC Unified Architecture (OPC UA) protocol for secure industrial data access in read-only mode, supporting both Historical Access (HA) and Data Access (DA) modes.
- Modern successor to OPC Classic™ (see OPC Classic™ connector)
- TCP/IP based with tree-like address space
- Uses node IDs for data referencing
- Implemented using node-opcua library
- Natively embedded in many industrial controllers
OPC Classic vs OPC UA
| OPC Classic™ | OPC UA | |
|---|---|---|
| Standard | Three separate specs: DA (live values), HDA (historical data), AE (alarms & events) | Single unified standard: DA (live values) + HA (historical access) + alarms |
| Historical mode name | HDA — Historical Data Access | HA — Historical Access (OPC UA Part 11). Same concept, different name — see note below |
| Transport | COM/DCOM — Windows inter-process communication only | TCP/IP or HTTPS — works over any IP network |
| Platform | Windows only | Cross-platform: Windows, Linux, macOS, embedded |
| Security | Relies on Windows domain/DCOM security | Built-in: message signing, encryption, certificate-based auth |
| Introduced | 1996 | 2006 |
| OIBus requirement | Requires an OIBus Agent running on the Windows machine that hosts the OPC server | Connects directly from OIBus — no agent needed |
Users coming from an OPC Classic background often look for HDA in OPC UA and cannot find it.
OPC UA renames the equivalent feature HA (Historical Access, defined in OPC UA Part 11).
The concept is identical — querying a server for values recorded in the past — but the acronym
changed. In OIBus, the OPC Classic connector calls the mode HDA, and the OPC UA connector calls
it HA. Do not confuse OPC UA HA with OPC Classic HDA: they are separate protocols and are not
interoperable.
Choose OPC Classic when your infrastructure already runs OPC DA or OPC HDA servers that cannot be migrated. An OIBus Agent must be deployed on the Windows machine that hosts those servers.
Choose OPC UA for any new deployment. OPC UA is the current industry standard: platform-independent, network-friendly, and with native security built in.
Common OPC UA Servers
| Server | Vendor | Modes | Notes |
|---|---|---|---|
| S7-1500 / S7-1200 | Siemens | DA | Native OPC UA server built into modern Siemens PLCs — no additional software needed. Older S7-300/400 use OPC Classic via SIMATIC NET instead |
| KEPServerEX | PTC (Kepware) | DA | Exposes an OPC UA endpoint in addition to its OPC Classic interface — useful transition path |
| Ignition | Inductive Automation | DA | Popular SCADA platform with a built-in OPC UA server |
| PI Server | AVEVA (OSIsoft) | DA, HA | Also exposes an OPC Classic HDA interface — see the OPC Classic connector page |
| OPC UA Simulation Server | Prosys | DA, HA | Free simulation server; ideal for testing OIBus configuration before connecting to a real server |
Specific Settings
Connection Configuration
| Setting | Description | Example Value |
|---|---|---|
| Endpoint URL | URL of the OPC UA server. | opc.tcp://localhost:4840 |
| Keep session alive | Keep the session alive between messages. | Enabled/Disabled |
| Retry Interval | Delay in milliseconds between retries. | 5000 |
| Read timeout | Maximum execution time in milliseconds for requests. | 15000 |
Data Throttling
| Setting | Description | Example Value |
|---|---|---|
| Number of messages before flush | Number of messages to accumulate before flushing to North caches | 1000 |
| Delay between flush | Time delay (in milliseconds) between automatic flushes of accumulated messages | 1000 |
Security Settings
| Setting | Description | Example Value |
|---|---|---|
| Security Mode | Security mode for the connection. | None, Sign, Sign and encrypt |
| Security Policy | Security policy for the connection. See note below for full list. | None, Basic256-SHA256, AES128-SHA256-RSA-OAEP |
| Value | Description |
|---|---|
| None | No security. Data is transmitted unencrypted with no message authentication. |
| Basic128 | AES-128 encryption, HMAC-SHA1 signing, RSA-1024 key exchange. |
| Basic192 | AES-192 encryption, HMAC-SHA1 signing, RSA-1024 key exchange. |
| Basic256 | ⚠️ Deprecated. AES-256 encryption, HMAC-SHA1 signing. Avoid — SHA-1 is cryptographically weak. |
| Basic128-RSA15 | ⚠️ Deprecated. AES-128 encryption, HMAC-SHA1 signing, RSA PKCS#1 v1.5 padding. Avoid — both SHA-1 and RSA-1.5 are weak. |
| Basic192-RSA15 | AES-192 encryption, HMAC-SHA1 signing, RSA PKCS#1 v1.5 padding. |
| Basic256-RSA15 | AES-256 encryption, HMAC-SHA1 signing, RSA PKCS#1 v1.5 padding. |
| Basic256-SHA256 | AES-256 encryption, HMAC-SHA256 signing, RSA-OAEP padding. Recommended for most deployments. |
| AES128-SHA256-RSA-OAEP | AES-128 encryption, SHA-256 signing, RSA-OAEP padding. Modern standard (OPC UA Part 2 rev. 1.05). |
| PubSub AES-128-CTR | AES-128-CTR symmetric encryption for OPC UA Pub/Sub mode. |
| PubSub AES-256-CTR | AES-256-CTR symmetric encryption for OPC UA Pub/Sub mode. |
Authentication Methods
| Setting | Description | Example Value |
|---|---|---|
| Authentication | Authentication method for the OPC UA server connection. | Anonymous, Username/Password, Certificate |
| Username | Username for Username/Password authentication. | opc_user |
| Password | Password for Username/Password authentication. | •••••••• |
| Client certificate | Client certificate file for Certificate authentication. | /path/to/cert.pem |
| Private key | Private key file for Certificate authentication. | /path/to/key.pem |
Group Settings
Items are organised into groups. Each group defines a shared schedule and, for HA mode, the default throttling parameters for all items it contains.
| Setting | Description | Example Value |
|---|---|---|
| Name | Unique label for the group within this connector. | Group A |
| Scan mode | Collection schedule applied to every item in the group. | Every 1 min |
Throttling Settings
Throttling controls how OIBus paces historical data requests. These settings appear on each group (for connectors that support groups) or on each item (for single-item connectors). Items in a group can override the group defaults by disabling the Sync with group toggle.
| Setting | Description | Example Value |
|---|---|---|
| Max read interval | Maximum duration of each sub-query in seconds. Larger time ranges are automatically split into chunks not exceeding this value. | 3600 |
| Read delay | Pause in milliseconds between consecutive sub-queries. Helps prevent server overload and manages rate limits. | 1000 |
| Overlap | Time in milliseconds subtracted from @StartTime of each query to capture late-arriving data from the previous interval. | 60000 |
How Throttling Works
- Interval splitting — A 24-hour range with
Max read interval = 3600(1 hour) is split into 24 separate 1-hour sub-queries. - Read delay — A pause is inserted between sub-queries to manage server load.
- Overlap — With
Overlap = 60000(1 minute), a query for[10:00–11:00]actually requests[9:59–11:00], ensuring no late-arriving data is missed.
The overlap value is subtracted from the start of the overall query, not from the start of each individual sub-interval when a large range is split into chunks.
Recommended Configurations
| Scenario | Max read interval | Read delay | Overlap |
|---|---|---|---|
| Stable network, small datasets | 3600 (1 hour) | 500 | 0 (no overlap) |
| Unstable network | 1800 (30 min) | 2000 | 0 (no overlap) |
| Large historical retrievals | 7200 (2 hours) | 1000 | 0 (no overlap) |
| Real-time with occasional gaps | 900 (15 min) | 200 | 15000 (15 sec) |
Each item can override the group throttling defaults by disabling the Sync with group toggle in the item edit form.
Item Settings
| Setting | Description | Example Value |
|---|---|---|
| Node ID | Path to the data point in the OPC UA server namespace. | ns=3;i=1001, ns=3;s=Counter |
| Mode | Data access method: ha (Historical Access) or da (Data Access). | ha, da |
| Aggregate | Value aggregation method (HA mode only). | Raw, Average, Minimum, Maximum, Count |
| Resampling | Interval resampling (HA mode only). | None, 1 second, 1 hour, 1 day |
| Timestamp origin | Timestamp source: OIBus (query time), Point (server-reported timestamp), Server (server current time). | OIBus, Point, Server |
- Verify server supports selected mode (HA/DA)
- Not all servers support all aggregation/resampling options
- Recommended: Use
Rawaggregation andNoneresampling
| Value | Description |
|---|---|
| Raw | All raw values in the interval |
| Average | Arithmetic mean |
| Minimum | Minimum value in the interval |
| Maximum | Maximum value in the interval |
| Count | Number of data points |
None · 1 second · 10 seconds · 30 seconds · 1 minute · 1 hour · 1 day
Security Configuration
Communication Certificate
When Security Mode is set to Sign or Sign and Encrypt, OIBus authenticates itself to the OPC UA server
using a certificate. This certificate is:
- Auto-generated by OIBus on first startup (4096-bit RSA, self-signed)
- Location:
<OIBusData>/certs/cert.pem— private key:<OIBusData>/certs/private.pem
Before a secured connection can be established, the OPC UA server must trust this certificate. If it is not in the server's trusted store, OIBus will log:
The connection may have been rejected by the server
To authorise it, import or copy <OIBusData>/certs/cert.pem into the server's trusted certificate store.
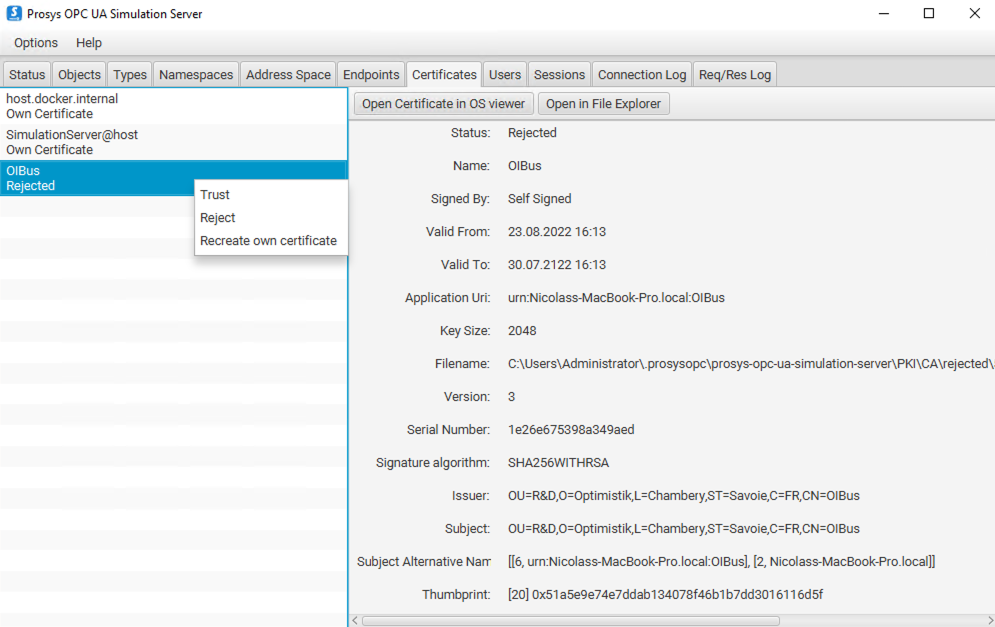
- Trusted:
.prosysopc\prosys-opc-ua-simulation-server\PKI\CA\trusted\certs\ - Rejected (move from here to trusted):
.prosysopc\prosys-opc-ua-simulation-server\PKI\CA\rejected\
Authentication Certificate
When Authentication is set to Certificate, you must supply a separate identity certificate and its
private key in the connector settings (Client certificate and Private key fields). This certificate
identifies the user, independently of the transport security certificate above.
The server must also trust this identity certificate. For Prosys, import it into:
.prosysopc\prosys-opc-ua-simulation-server\USERS_PKI\CA\certs\
If the server rejects it, OIBus logs BadIdentityTokenRejected (0x80210000). In Prosys, rejected identity
certificates land in .prosysopc\prosys-opc-ua-simulation-server\USERS_PKI\CA\rejected\ — move them to
the certs\ folder next to it.
You can point the Client certificate and Private key connector fields to OIBus's own certificate
(<OIBusData>/certs/cert.pem and <OIBusData>/certs/private.pem) to use a single certificate for
both transport-level security and user authentication.
Creating a Custom Authentication Certificate for Prosys
If you need a dedicated identity certificate, used to authenticate OIBus, not only signing the communication, generate one with OpenSSL:
- Create
cert.conf:
[ req ]
default_bits = 2048
default_md = sha256
distinguished_name = subject
req_extensions = req_ext
x509_extensions = req_ext
string_mask = utf8only
prompt = no

[ req_ext ]
basicConstraints = CA:FALSE
nsCertType = client, server
keyUsage = nonRepudiation, digitalSignature, keyEncipherment, dataEncipherment, keyCertSign
extendedKeyUsage= serverAuth, clientAuth
nsComment = "OIBus User Cert"
subjectKeyIdentifier=hash
authorityKeyIdentifier=keyid,issuer
subjectAltName = URI:urn:opcua:user:oibus,IP: 127.0.0.1

[ subject ]
countryName = FR
stateOrProvinceName = FR
localityName = Chambéry
organizationName = OI
commonName = oibus
- Generate the certificate and strip the passphrase:
# Create key and certificate
openssl req -new -x509 -keyout oibus.key -out oibus.pem -config cert.conf

# Remove passphrase from key
openssl rsa -in oibus.key -out oibus.key

# Convert to DER format (required by some servers)
openssl x509 -inform PEM -outform DER -in oibus.pem -out oibus.der
- Install in Prosys's user PKI store:
cp oibus.der ".prosysopc/prosys-opc-ua-simulation-server/USERS_PKI/CA/certs/"
Then, in the OIBus connector settings, set Client certificate to oibus.pem and Private key to oibus.key.